Camera Guide: Recording & Motion Detection
Guide: cable camera
Guide: Battery camera
Cabel camera
Constant recording
1 From the camera home page, click on the pencil in the upper right corner.

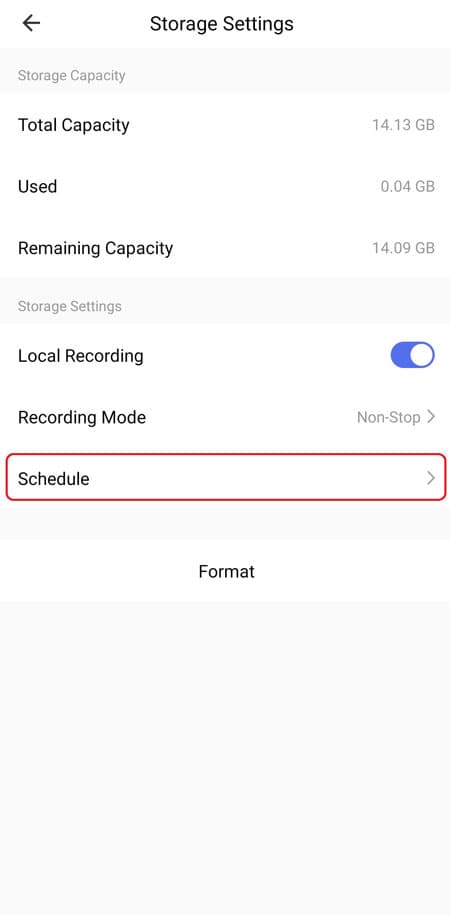
2 Click "Storage Settings"

3 If this is the first time you are using the SD card, press "Format" and then "Confirm". Wait for the camera to format the card (this can easily take up to a few minutes).

4 Make sure "Local Recording" is turned on. When the white circle is on the right and the rest is blue, it is activated (see picture below).

5 Next, press "Recording Mode" and check "Non-stop".

6 Now the camera records continuously and will only overwrite the oldest when the sd card is full.
Motion recording
1 First follow the continuous recording instructions from points 1-4 above.
2 Next, press "Recording Mode" and check "Event Recording".

3 Back in the "Settings" menu, select "Detection Alarm Settings".

4 Here we switch on "Motion Detection Alarm".
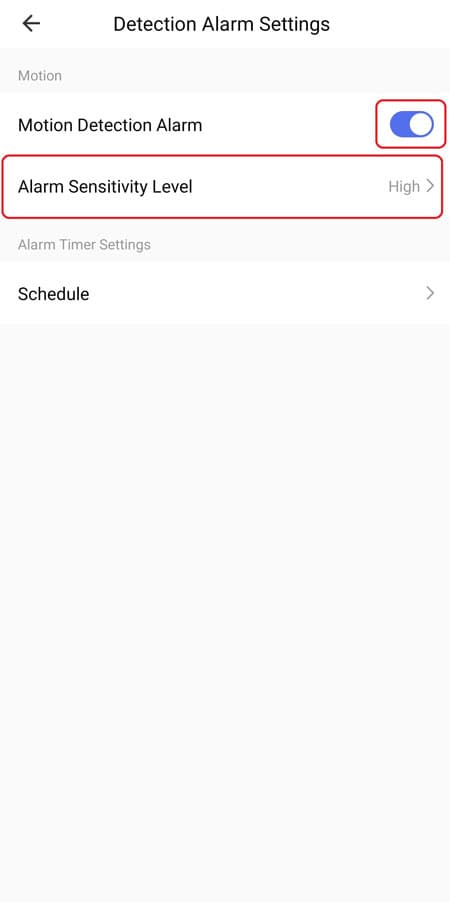
5 We can also change the sensitivity under "Alarm Sensitivity Level".
Scheduled recording (Can be made for continuous recording or recording on movement)
1 After turning on either continuous recording or motion recording, proceed here.
2 In "Storage Settings" press "Schedule"
3 Next, press "Add" to add a timer for recording.

4 At the top, select a time you want to start recording.

5 If you switch on "Notification", you will receive a push message when the timer starts recording.
6 At the bottom, we choose what the timer should do. If "On" is selected, the timer will activate recording and if "Off" is selected, the timer will deactivate recording.
7 Under "Repeat" you can choose whether you want to repeat the timer several days of the week.

8 Now click "Save" at the top right to save the timer.
9 Next, you can add more hours by pressing "Add Schedule" at the bottom.

10 Remember to create a timer for activating recording and for deactivation.
11 Timers can be enabled or disabled by pressing the small slider to the right of the timer.
Battery camera
Motion recording
With a battery camera, you can record when there is movement that activates the camera. When the SD card is full, the camera will automatically overwrite the oldest recording.
1 From the camera's home page, click on the three dots in the upper right corner.

2 If this is the first time you are using the SD card, select "Storage Settings", press "Format" and then "Confirm". Wait for the camera to format the SD card (this can easily take up to a few minutes).


3 From the "Settings" menu, select "PIR". This is the motion detection. If "Off" is selected, the camera will neither record nor give notifications when there is movement. If "Low" is selected, the camera will record when there is movement and give notifications. The motion sensor is set to low sensitivity. If "High" is selected, the camera will record when there is movement, give notifications and have a high sensitivity to movements.


4 "Detection Alarm Settings" can also be selected from the "Settings" menu. Here you can activate or deactivate a human filter. If "Human Body Filtering" is activated, the camera will be less sensitive to movement that does not have a human form. This is practical if, for example, you do not want recordings of animals running through the garden or similar.

